How to set up Request access
1. What Request access does
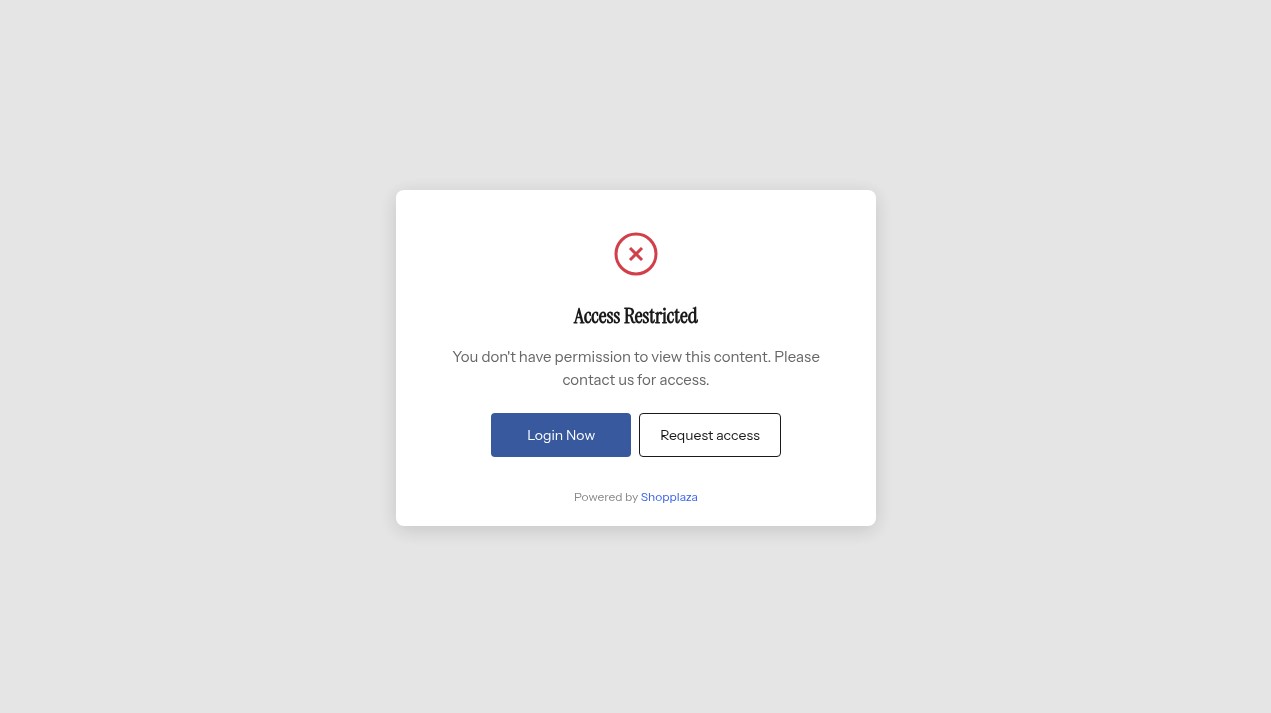
With Request access, visitors who are locked out of your content can ask you to let them in. You review the request in the app and click Approve. The app then adds your tags to the customer and emails them, so they can sign in and shop. You don’t need to tag customers or send emails by hand.
Visitors can send a request in two ways:
- From the lock screen: a Request access button appears on the lock screen of an Access rule.
- From a page of your store: you add the Access request form to any page of your theme, for example a Become a dealer page.
All requests arrive on the Access requests page in the app.
Note: Request access is off on every rule. Nothing changes on your store until you turn it on.
2. Add a Request access button to a rule
You can add the button to two kinds of rules:
- Rules that allow only customers with specific tags, or any logged-in customer. This includes Entire store rules. See Allow selected groups only.
- Secret Link rules. Here the button also shows when a visitor opens an expired or invalid link. See Secret link.
Rules that block visitors don’t have this option.
To turn it on:
- Go to Access Rules and open the rule, or create a new one.
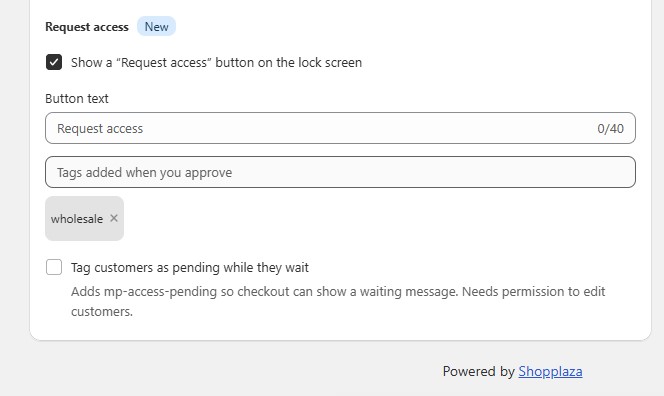
- In the Request access section, tick Show a “Request access” button on the lock screen.
- Button text: the text on the button. Leave it empty to show Request access.
- Tags added when you approve: the tags the customer gets when you approve them, up to 10. By default these are the rule’s own tags, so an approved customer can open the locked pages straight away.
- Optional: tick Tag customers as pending while they wait. When a signed-in customer sends a request, the app gives them the tag mp-access-pending. If they go to checkout before you decide, they see a message that their account is waiting for approval. The app removes this tag when you approve or reject them.
- Click Save.
Note: The pending tag needs permission to edit customers. See 4.5. Permission to edit customers.
3. Add an application form to a page
The lock screen button only shows to visitors who are already locked out. To let anyone apply, for example from an Apply for a trade account page, add the Access request form to a page. The form works on its own, without an Access rule.
- In Shopify, go to Online Store → Themes → Customize.
- Open the page template you want to use, for example your Become a dealer page.
- Click Add block (or Add section) → Apps → Access request form.
- Edit the texts of the form: Heading, Text, Button label and Success message.
- Click Save.
The form’s fields and the tags customers get when you approve them are set in the app, under Settings → Request access. See 5. Request access settings.
4. Review requests
4.1. See new requests
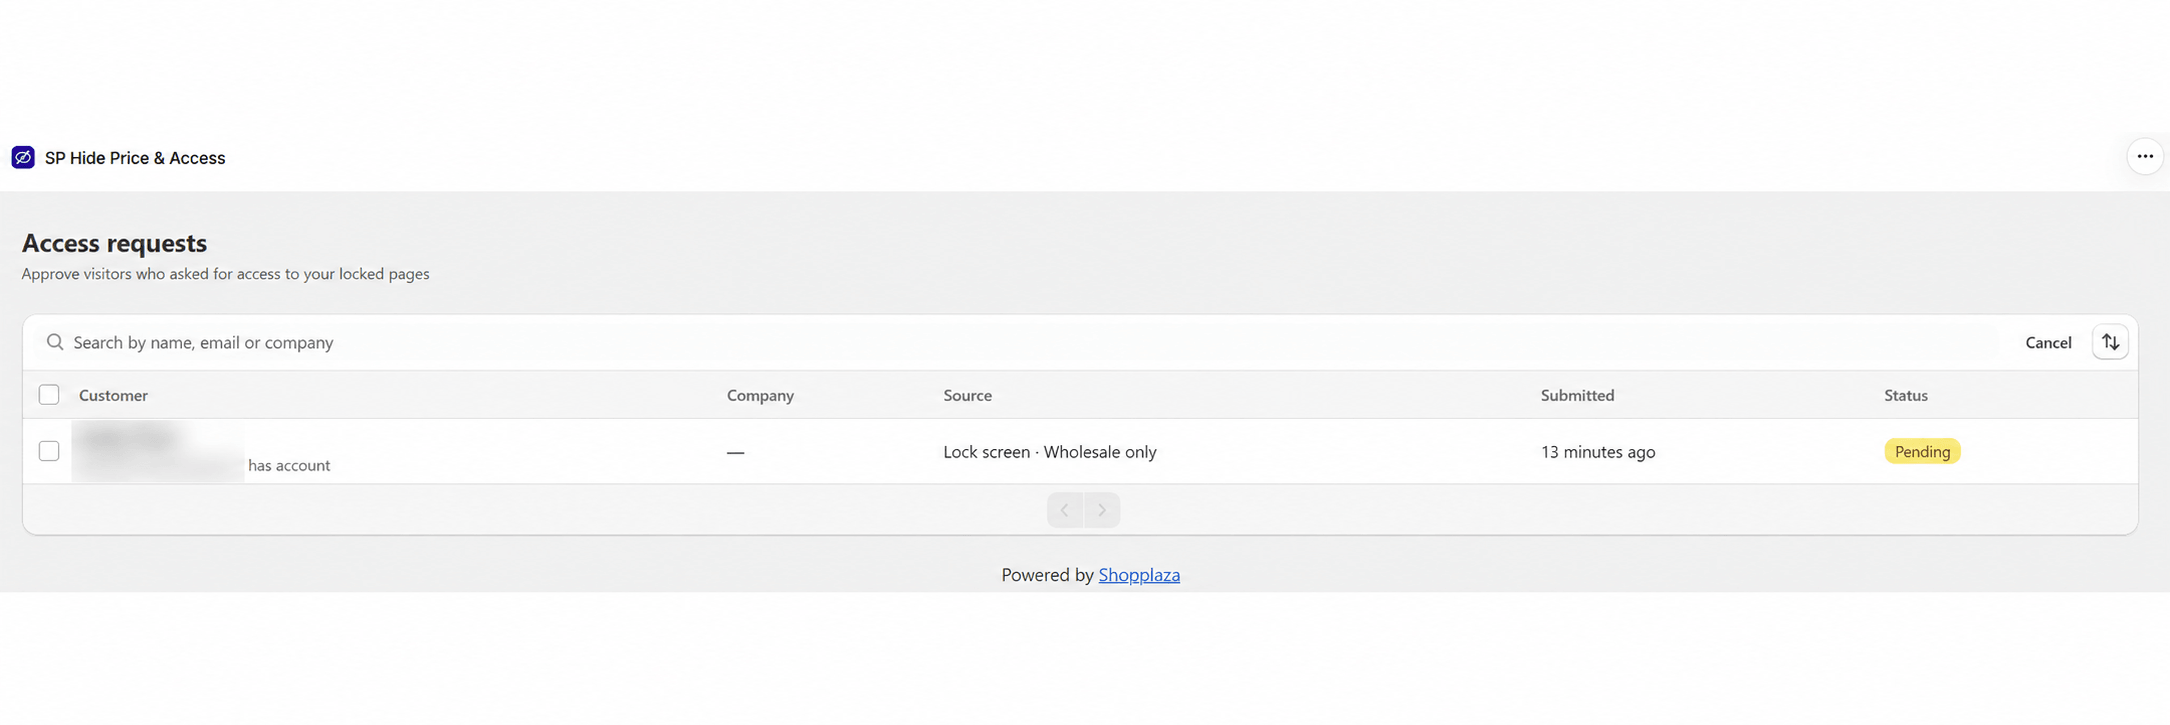
New requests wait on the Access requests page in the app menu. When there are requests to review, the Dashboard shows a banner with a Review requests button.
On the Access requests page, you can:
- Switch between the Pending, Approved, Rejected and All tabs.
- Search by name, email or company, and sort by Newest first or Oldest first.
- See each request’s Customer, Company, Source (Lock screen or Form block), Submitted date and Status.
Click a request to see its details: email, company, phone, the page it was sent from, the rule, and whether the visitor was signed in to an account.
4.2. Approve a request
- Add tags: the tags the customer gets. They start with the rule’s tags, or the form’s tags for requests from a page. If the visitor doesn’t have an account yet, the app creates one for them.
- Send approval email: on by default. The customer gets an email telling them they’ve been approved.
- For requests from a Secret Link rule: tick Also send a personal secret link to include a private link in the approval email. The link expires after 30 days and works in 1 browser.
- Click Approve.
4.3. Reject a request
- Reason (optional): the customer sees it in the rejection email.
- Send rejected email: on by default.
- Click Reject request.
The visitor can send a new request after 7 days.
4.4. Approve or reject several requests at once
Tick the requests in the list, then click Approve or Reject. You can select up to 50 requests at a time. Each customer gets the tags set on the rule they asked from.
4.5. Permission to edit customers
To add tags and create customer accounts, the app needs permission to edit your customers. If it doesn’t have it, the request shows Permission needed to tag customers. Click Grant permission and approve in Shopify.
Important: You can still approve without this permission, but only the email (and secret link) is sent. The app doesn’t add tags or create the customer, so the customer still can’t open your locked pages.
5. Request access settings
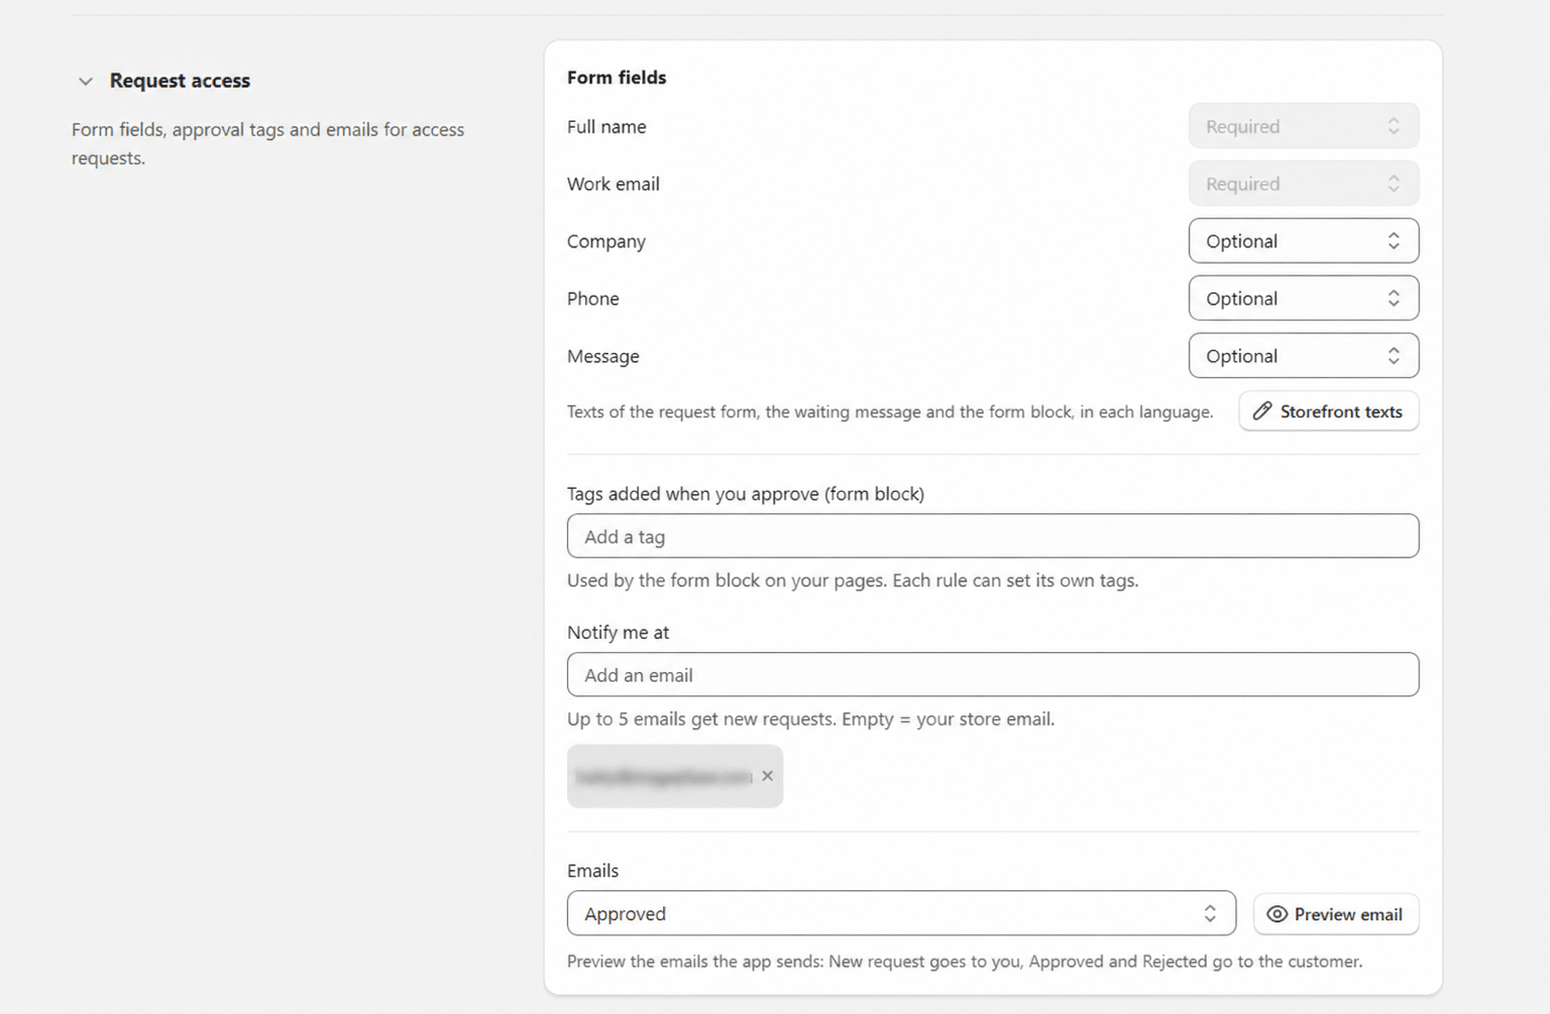
Go to Settings → Request access. These settings apply to every request, from the lock screen and from the form on your pages.
| Setting | What it does | Default |
|---|---|---|
| Form fields | Choose whether Company, Phone and Message are Required, Optional or Hidden. Full name and Work email are always required. | Optional |
| Storefront texts | Change any text of the request form, the waiting screen and the page form, in each language. Leave a field empty to use the default text shown in grey. | English texts |
| Tags added when you approve (form block) | The tags customers get when you approve a request sent from a page form. Requests from a lock screen use the tags set on the rule. | None |
| Notify me at | The emails that get an alert for each new request, up to 5. | Your store email |
| Emails | Preview the emails the app sends: New request (to you), Approved and Rejected (to the customer). | – |
In Storefront texts, you can use {email} for the visitor’s email and {date} for a date.
Example: Request sent. We’ll email {email} when your account is approved.
👉 Want to change the text of an email? Open Preview email and click contact our support team. Our team updates it for you.
6. Email settings
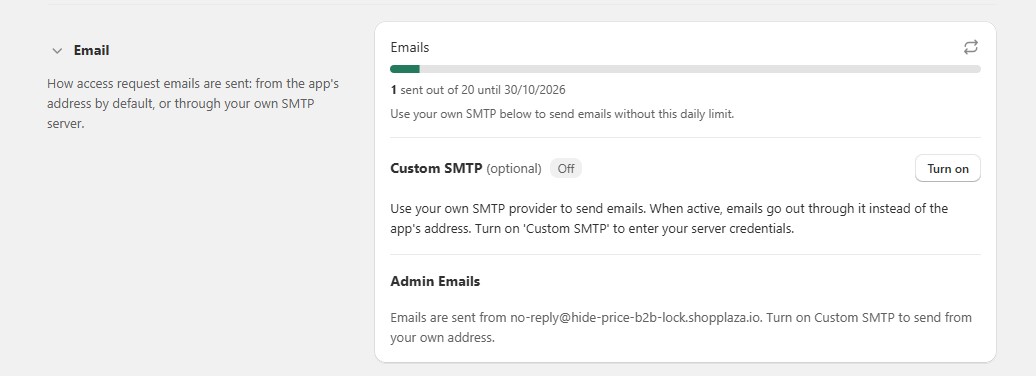
By default, the app sends request emails from its own address, up to 100 emails a day. The Emails bar in Settings → Email shows how many emails were sent today and when the count resets.
To send from your own email address, or to send more than 100 emails a day, set up Custom SMTP (optional):
- Turn on Custom SMTP and confirm.
- Click Load settings and choose your email provider, for example Gmail, Amazon SES or SendGrid. The Host and Port fill in for you.
- Enter the Username and Password of your email account.
- Click Verify Config. The status changes to Verified.
- Under Admin Emails, set Send from: the sender address your customers see.
- Click Save.
Note:
- Until your settings show Verified, emails are still sent from the app’s address.
- After you save, the password is hidden. To keep it, leave the field blank when you edit other settings.
- Amazon SES and SendGrid only send from an address or domain you’ve verified with them. The card shows the steps for your provider.
7. What your customers see
- Lock screen: your usual lock message, plus a Request access button.
- Request form: Full name and Work email, plus Company, Phone and Message if you show them. Signed-in customers see their account email already filled in and can’t change it.
- After sending: Request sent. We’ll email {email} when your account is approved. If they come back in the same browser, they see We’re reviewing your request instead of the form.
- Sending again: a signed-in customer who already has a request waiting is told so. After a rejection, they see You can send a new request after {date}.
- Your decision: the Approved or Rejected email, if you left it on.
- At checkout: if Tag customers as pending while they wait is on, a waiting customer who tries to buy a locked product sees Your trade account is waiting for approval. We’ll email {email} as soon as it’s ready. This only shows on rules that already block checkout.
8. Troubleshooting
| Problem | What to check |
|---|---|
| There's no Request access button on the lock screen | The rule allows customers with tags or any logged-in customer, or it's a Secret Link rule. The checkbox is ticked, and the rule is saved and active. |
| An approved customer is still locked out | The tags in Add tags match the tags the rule allows. The app has permission to edit customers (click Grant permission if not). The customer signs in with the email they used in the request. |
| The customer didn't get the email | Send approval email was on. In Settings → Email, today's emails are under the daily limit, and Custom SMTP (if you use it) shows Verified. Ask the customer to check their spam folder. |
| You don't get emails about new requests | Check the address in Settings → Request access → Notify me at. If it's empty, alerts go to your store email. |
👉 I approved a guest. How do they get in? The app creates a customer account with their email and adds the tags. They sign in with that email. For a Secret Link rule, you can also send them a personal secret link.
👉 Can I change the 7-day wait after a rejection? Not yet. It’s 7 days.
👉 Can I edit the email text? Open Preview email and click contact our support team. Our team updates it for you.
💡 Still stuck? Click Contact us in the app and our support team will help you 24/7.