2. Create & manage checkout rules
Go to Checkout Control Suite > Manage Rules.
This is where you can view, find, and manage all checkout rules created in the app.
From here, you can create a new rule, filter your existing rules, duplicate a rule, delete a rule, or access your saved templates.
2.1. Create a new rule
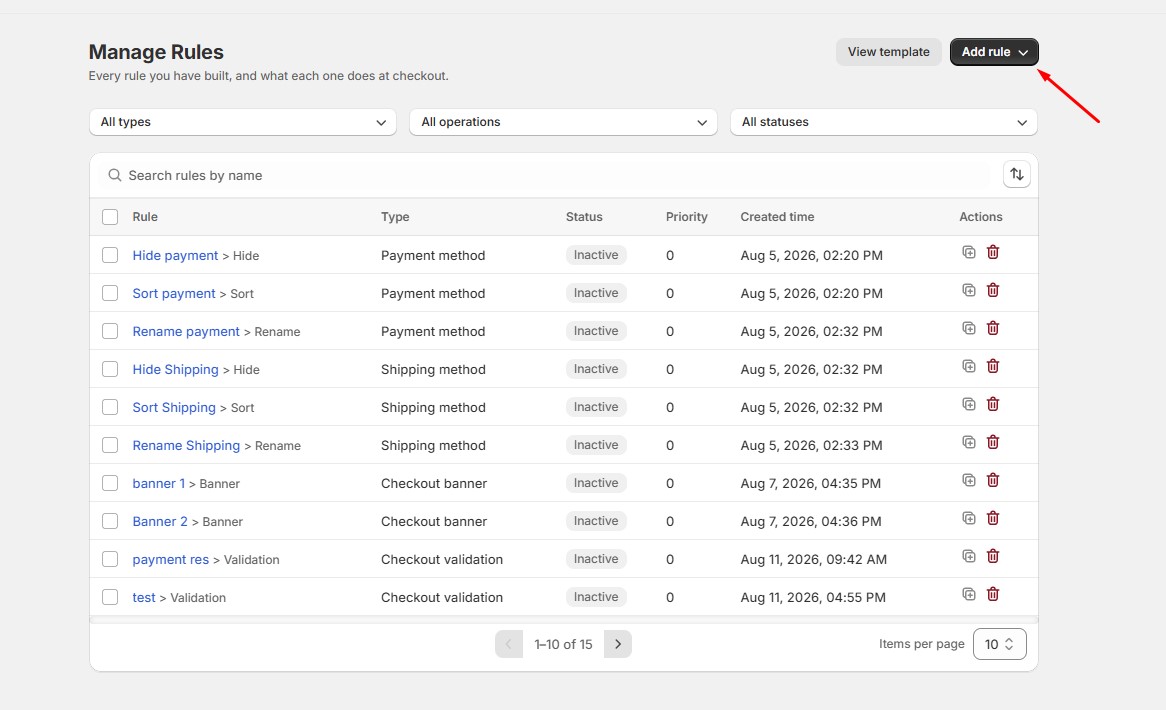
To create a checkout rule:
- Click Add rule in the upper-right corner.
- Choose what you want to control at checkout:
- Payment methods - Hide, reorder, or rename payment methods.
- Shipping methods - Hide, reorder, or rename shipping options.
- Shipping discount - Apply a percentage or fixed amount off a shipping rate.
- Checkout banner - Show a message at checkout.
- Checkout validation - Stop checkout when an order doesn’t meet your requirements.
- Select a rule type to open the Rule editor.
- Configure the rule’s General, Conditions, and Action settings.
- Click Save when you’re finished.
2.2. View your rules
| Column | Description |
|---|---|
| Rule | Rule name and its operation |
| Type | What the rule controls |
| Status | Whether the rule is Active or Inactive |
| Priority | The rule’s priority when rules conflict |
| Created time | When the rule was created |
| Actions | Options to duplicate or delete the rule |
Click a rule name to open and edit it.
2.3. Find and filter rules
Use the tools above the rule list to quickly find the rules you need.
You can filter by:
- Type - Payment method, Shipping method, Shipping discount, Checkout banner, or Checkout validation
- Operation - Such as Hide, Sort, Rename, Banner, or Validation
- Status - Active or Inactive
Use Search rules by name to find a specific rule.
You can also use the Sort button on the right side of the search bar to sort rules by created time or priority.
2.4. Edit a rule
Click the rule name to open the Rule editor.
Each rule contains three main tabs:
General - Set the rule name, status, description, priority, and schedule.
Conditions - Define when and for whom the rule applies.
Action - Define what happens at checkout when the conditions are met.
Make your changes, then click Save.
We’ll explain each of these settings in detail in Configure a Rule.
2.5. Understand rule priority
Priority determines which rule takes precedence when multiple rules affect the same payment or shipping method.
A lower number means a higher priority.
For example, a rule with priority 1 takes precedence over a rule with priority 5.
2.6. Duplicate a rule
To reuse an existing setup:
- Find the rule you want to copy.
- Click the Duplicate icon in the Actions column.
- A new rule is created with “(copy)” added to its name.
- Open the copied rule and make any necessary changes.
Duplicated rules are Inactive by default, so they won’t immediately affect checkout.
2.7. Delete a rule
To remove a rule:
- Find the rule you want to remove.
- Click the Delete icon in the Actions column.
- Confirm the deletion.
Once deleted, the rule will no longer apply at checkout.
2.8. Manage multiple rules
Use the checkboxes on the left side of the rule list to select multiple rules.
You can then perform bulk actions to:
- Activate
- Deactivate
- Duplicate
- Delete
This makes it easier to manage several rules at once.
2.9. Use rule templates
Templates help you quickly create rules for common checkout scenarios.
When creating a new rule, click Use template in the Rule editor to apply an existing template.
You can also click Save as template to save your current rule setup for future use.
To manage the templates you’ve saved, return to Manage Rules and click View template.
When a template is applied, it replaces the rule’s Conditions and Action settings while keeping the existing rule name, status, and priority.