How to set up AI size recommendation
Adding AI size recommendation to your Size Chart helps customers choose the right size more easily, increasing conversions and reducing returns.
This guide will show you how to create a size chart with AI size recommendations in just a few simple steps.
Ready to set it up? Follow the detailed guide below.
Create a Size Chart
To set up Size Recommendation, you first need to select the product type and prepare your size chart:
- Go to Manage charts.
- Choose the Product type you want to apply the size chart to (for example: Men’s Top Size Chart)
- Click Add to chart.
- Customize the size chart as needed (edit columns, units, image, text, etc.).
Read more: How to create and edit a new size chart?
Once your size chart is ready, switch to the Size recommendation tab to start setting up recommendations.
Step 1. Open the Size recommendation tab
In your size chart settings, click the Size recommendation tab.
Then, turn on the Enable recommendation toggle.
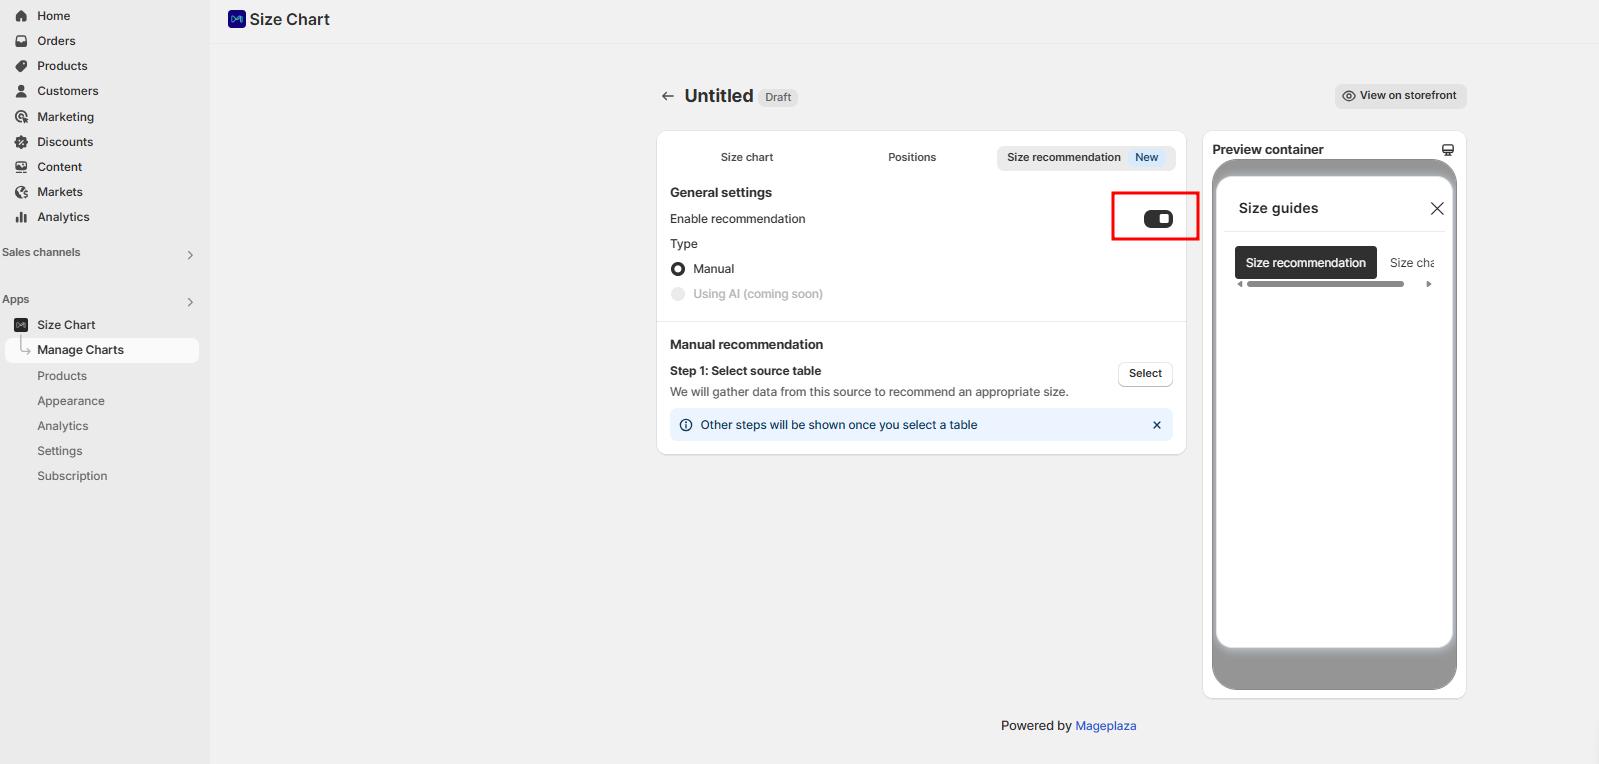
Once enabled, you will see 2 setup types:
- Using AI
- Manual
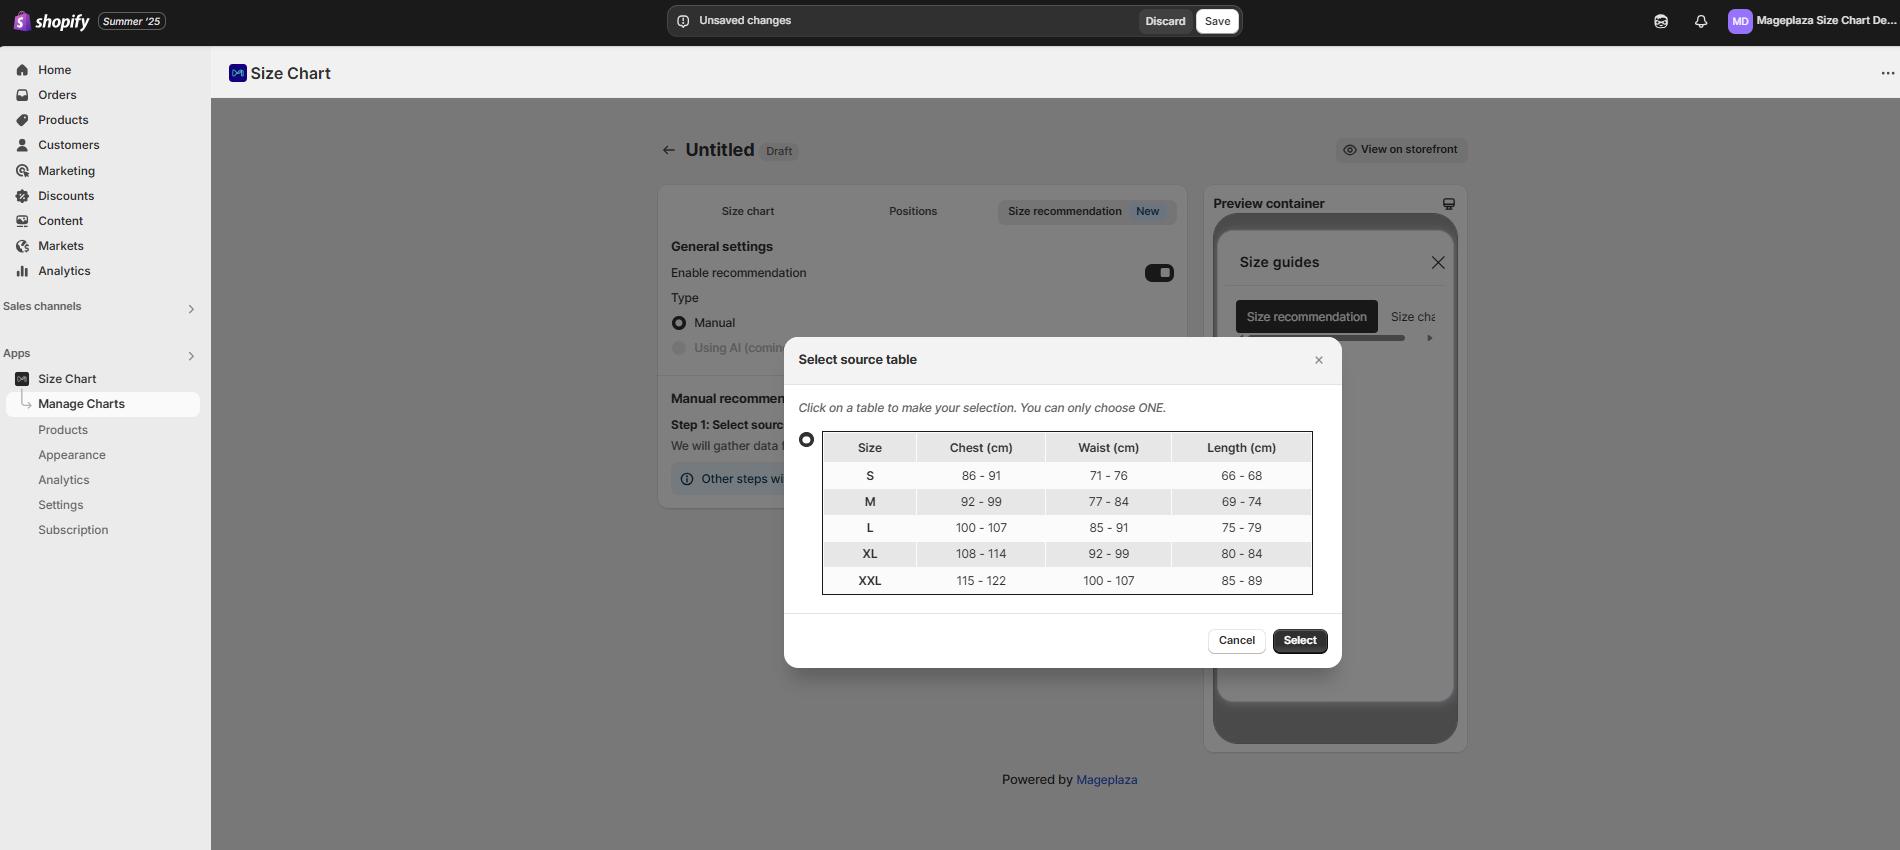
Option 1: Set up size recommendation with Using AI
If you choose Using AI, follow the steps below.
Step 1: Select a source table
- Click Select in the AI recommendation section.
- A popup will appear showing the available table(s).
- Choose one source table to use for the size recommendation.
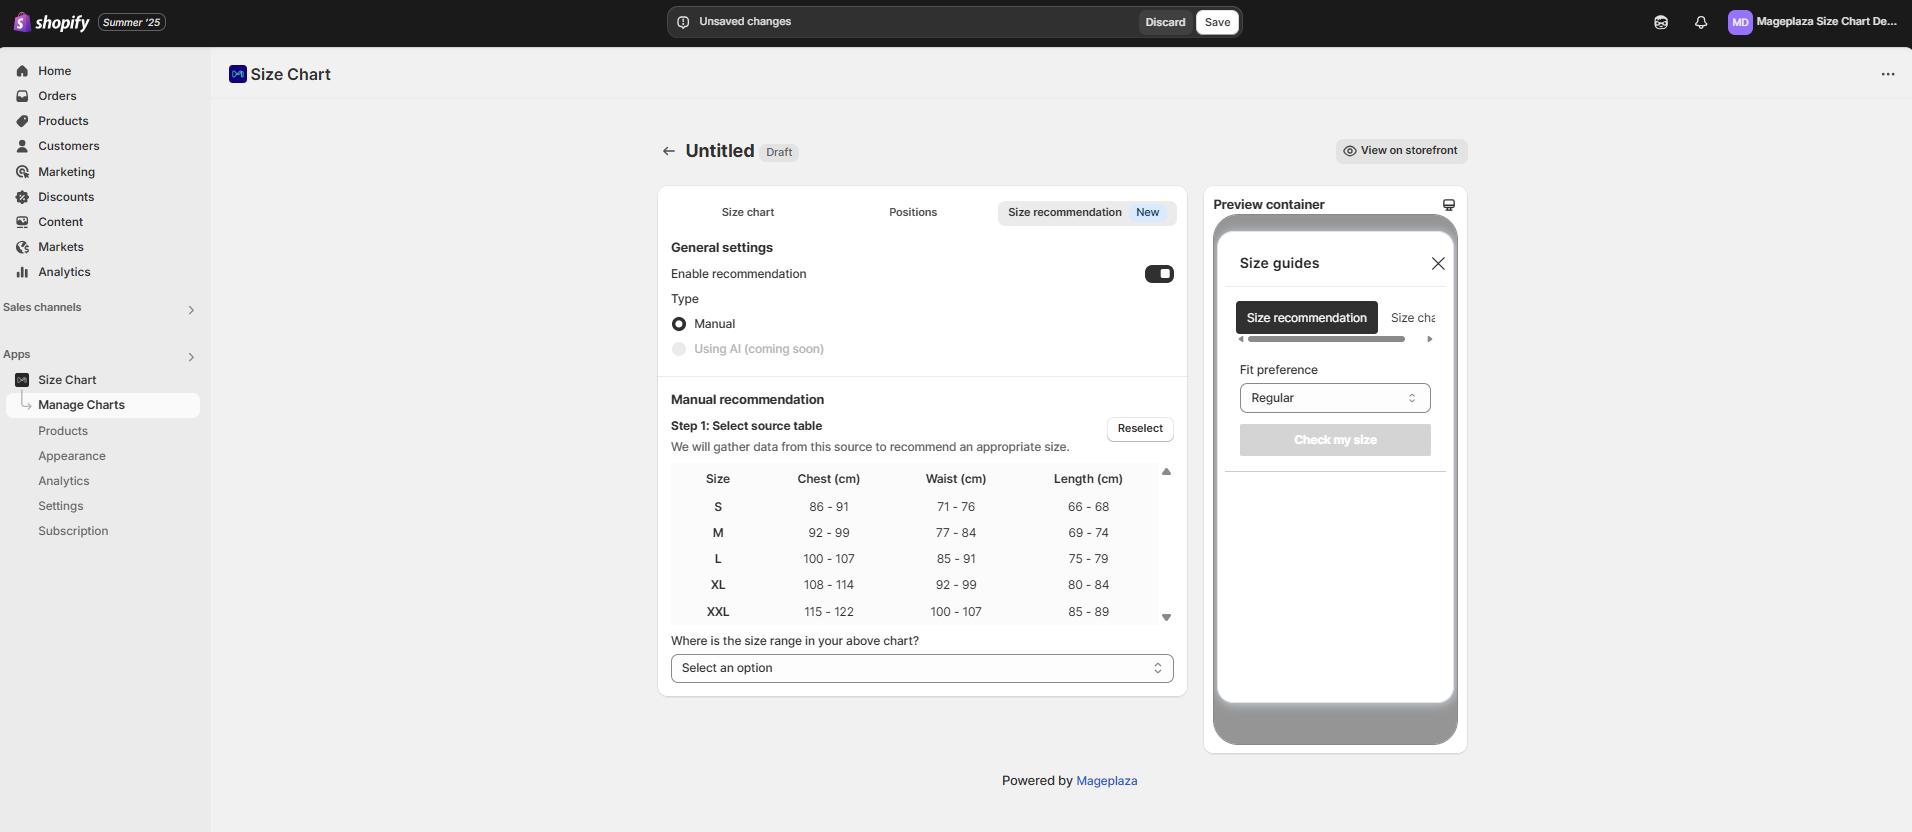
- After selecting a table, the chosen table will be displayed in the setup area.
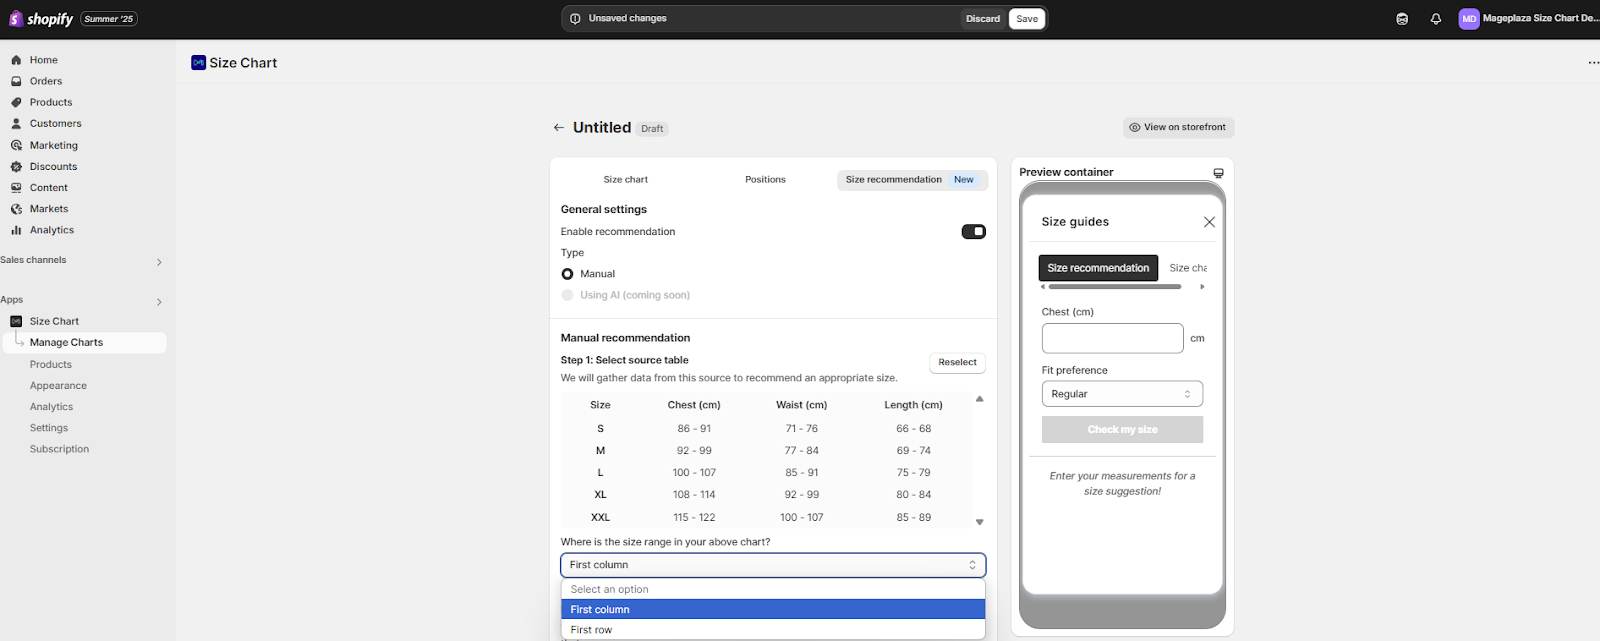
Step 2: Choose the measurement type
Under Measurement type, choose one of the following:
- Body measurement: Sizing is based on your customer’s body measurements.
- Product measurement: Sizing is based on the garment’s actual dimensions, including extra room for comfort.
Choose the option that best matches how your size chart is built.
Step 3: Select product info
Click Select product type.
A popup will appear with the supported product types.
Choose one of the 5 supported product types:
- Shoes
- Short-sleeved shirts
- Long-sleeved shirts
- Dress shirts
- Sleeveless shirts
Important: Please select the product type that matches the size chart template you chose at the beginning. For example, if your chart is for short-sleeved tops, choose Short-sleeved shirts.
Option 2: Manual
You can also choose the Manual type instead of Using AI.
This option allows you to manually configure the size recommendation flow based on your own setup needs.
Step 1: Select source table
In Select source table, click on Select button to choose the size chart you want to use as data source.
The data source is the size chart that provides the measurement data (chest, waist, length, etc.) used by the Size Recommendation feature.
When a customer enters their body measurements, the app will compare those inputs against the selected table and suggest the best matching size based on your chart data.
In other words: the accuracy of the size recommendation depends on the data in your selected size chart. The system does not generate sizes — it uses this table to calculate and suggest the right fit for your shoppers.
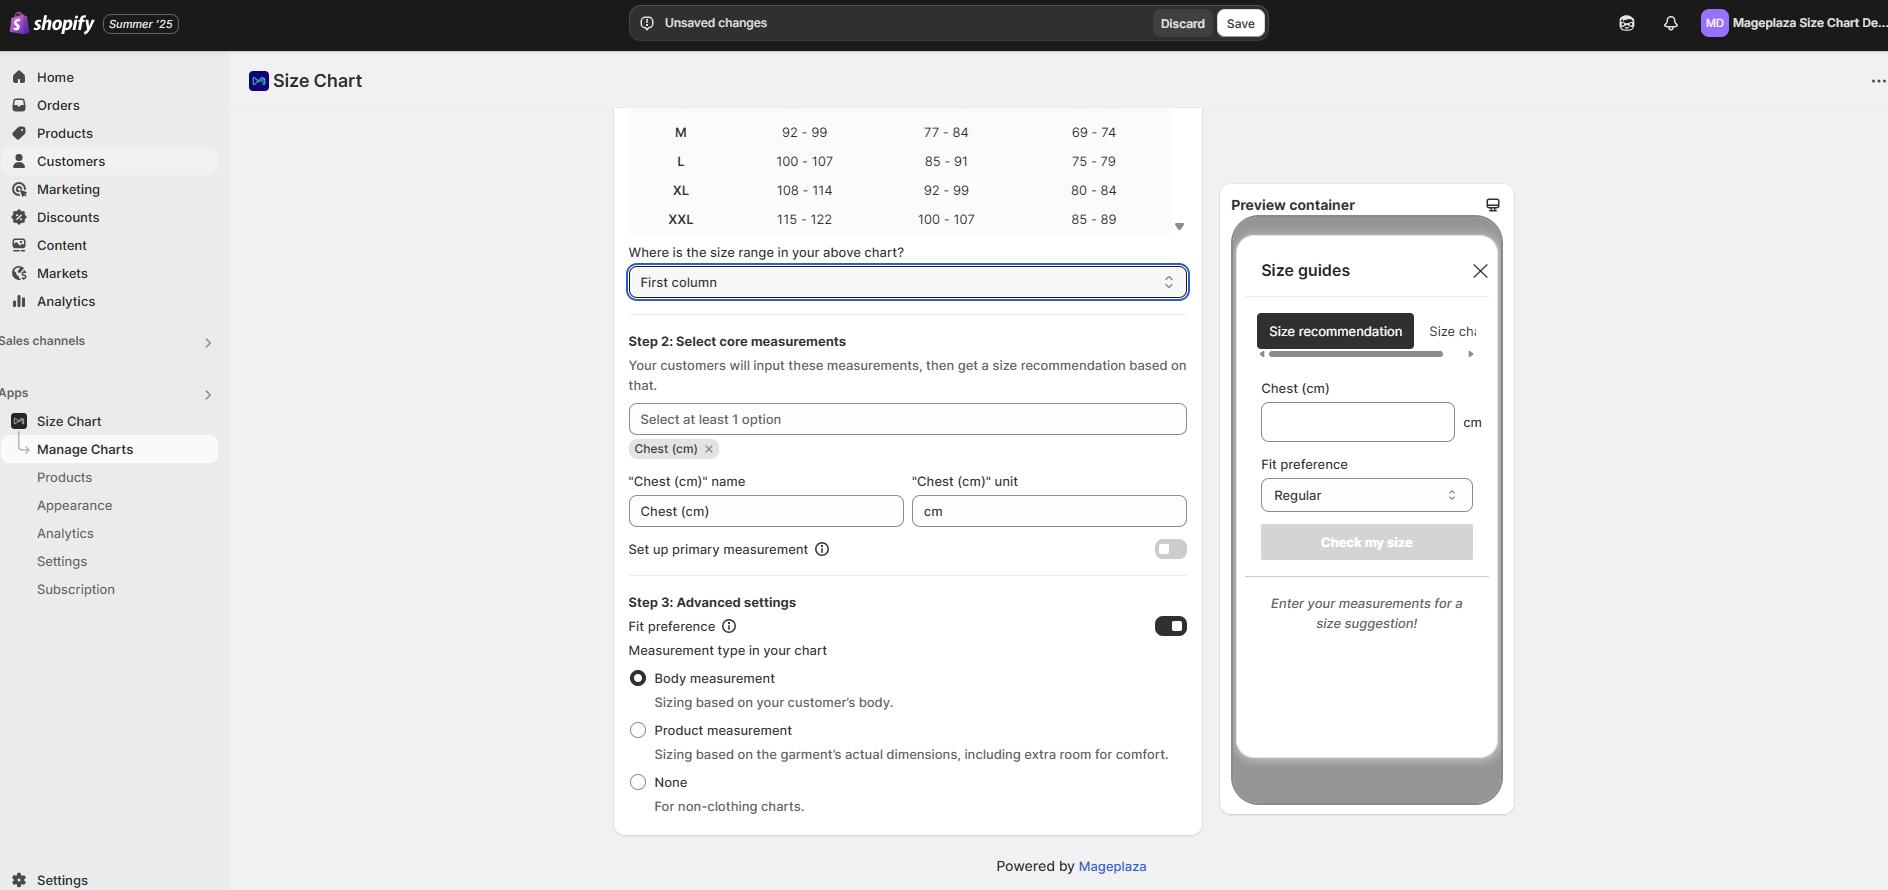
Step 2. Select Core Measurements
- Under Select core measurements, choose which measurements customers will input on the storefront.
- You can select one or multiple options — e.g.:
- Chest (cm)
- Waist (cm)
- Length (cm)
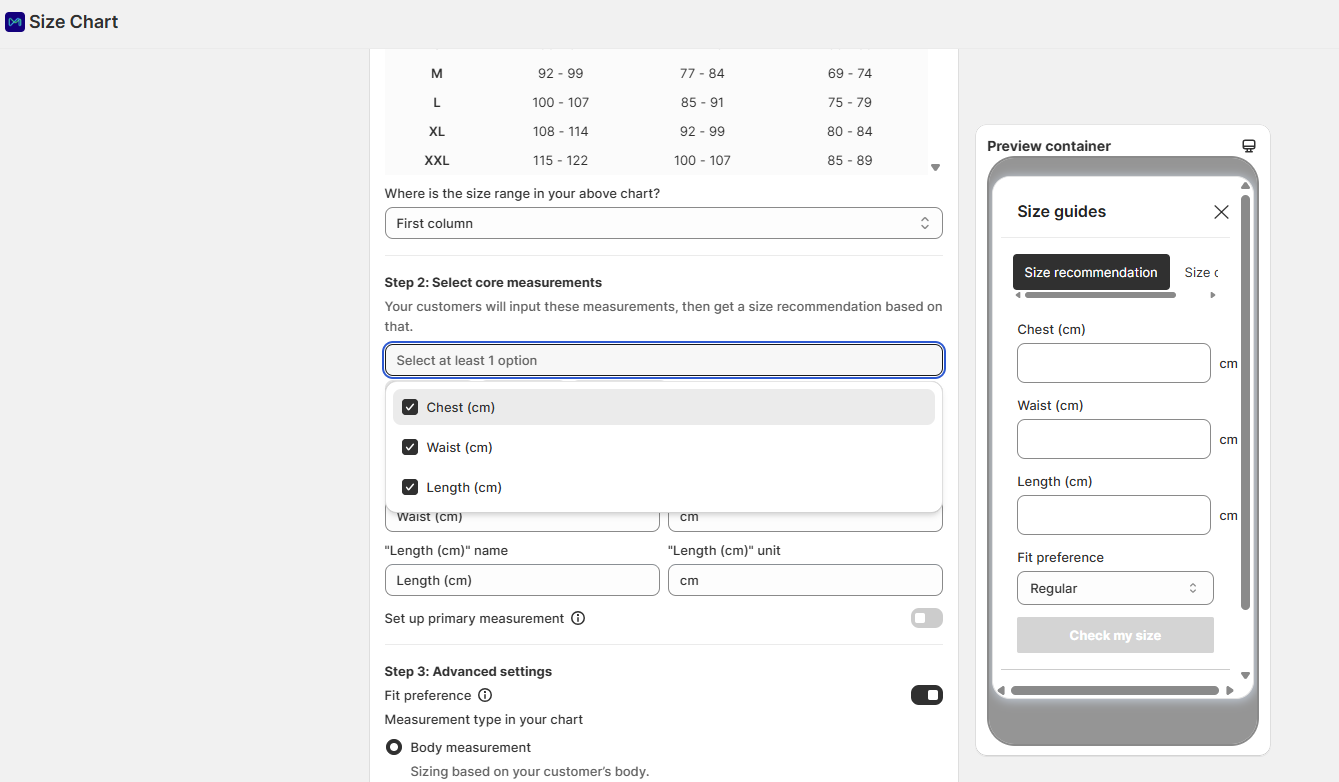
- Auto-fill key feature
- The Auto-fill key allows you to automatically save and reuse your customer’s measurement data across different size charts. It’s designed to streamline the sizing process and enhance the shopping experience — especially for returning customers.
- What it does:
- Save measurement data (e.g., chest, waist, bust) entered by the customer.
- Automatically applies saved data when the same measurement field appears on other charts.
- Help suggest the right size for future purchases, reducing size-related returns. * Important notes:
- Each key must be unique and consistent: For example, if you name a key “Chest (cm)” in one chart, don’t rename it later — or you risk breaking the data connection.
- Customers will not see the Auto-fill key. It’s used solely for backend logic.
- Customize the display name and unit (cm, inch) for each measurement.
- The default unit is cm.
- If your size chart uses inch (or a different unit), please make sure to select the correct unit, so that your size recommendation and customer inputs are calculated in the same measurement system.
- If needed, turn on Set up primary measurement to highlight the most important input field.
- Primary measurement allows you to mark one measurement as the key fit factor. The system will prioritize this field when making recommendations.
- This is especially useful for products where one specific measurement is critical for fit, for example:
- For pants > waist is primary
- For shoes > foot length is primary
- For bras > bust is primary
- For tight-fitting dresses > hip or bust might be primary * If a customer’s measurement does not match this field, recommending a size may not make sense, even if other dimensions match. * If your product has one “must-fit” dimension, you should turn this ON to ensure accurate recommendations.
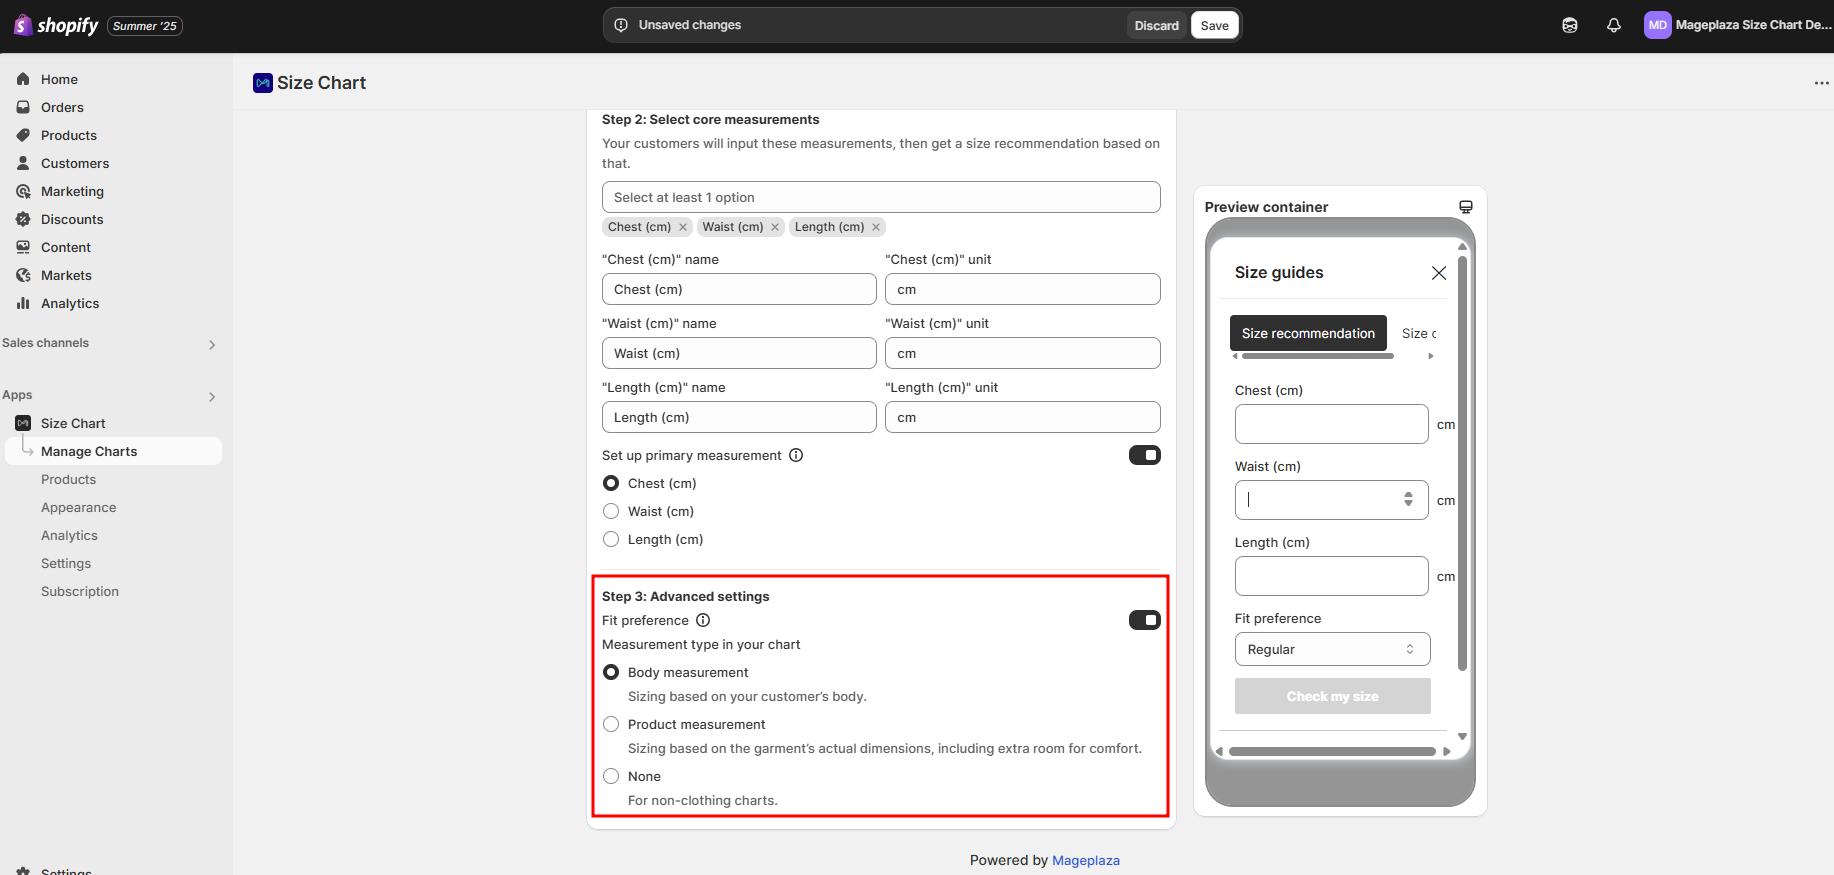
Step 3. Advanced Settings
In Advanced settings, you can customize how the Size Recommendation works:
- Measurement type in your chart:
- Body measurement → Based on the customer’s body (for clothing).
- Product measurement → Based on garment dimensions, including extra room for comfort.
- None → For non-clothing products.
- Fit preference (optional):
Adjust how fitted or loose you want the recommendation to be.
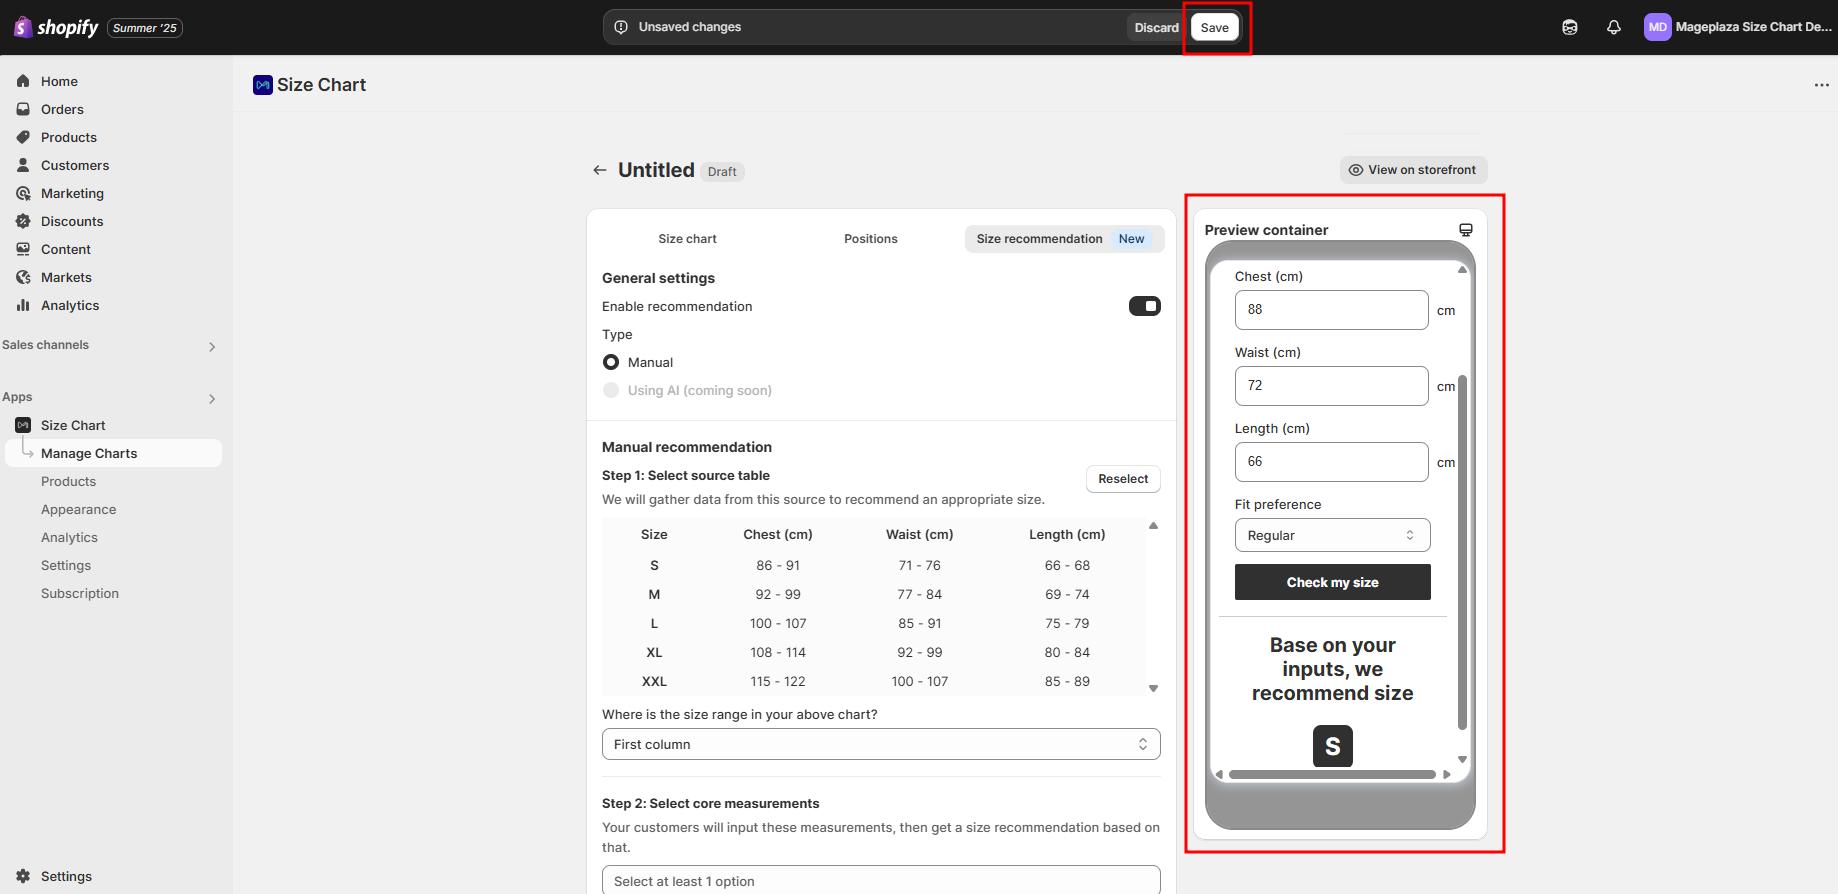
Final Step: Save & Preview
Once you’ve completed the steps above:
- Click Save
- Preview how your Size Recommendation looks in the right-hand panel or click View on storefront.
That’s it!
You’ve now successfully created a size chart with AI size recommendations in MP Size Chart & Size Guide.
Your customers will now see smart, personalized size recommendations — helping them shop with confidence.
Tips: You can always edit and update your size recommendations later to match new product collections or customer feedback.